Monday, August 24, 2015

Get Creative Challenge #22

Welcome back!!

It's that time again at Get Creative Challenges!

This week the challenge is to NOT use printed paper!!  Exciting right?!

Our lovely sponsor this week is Eureka Rubber Stamps.
I have to say I was absolutely blown away with their store.  Eureka Rubber Stamps have so many digital images and RUBBER images!  When I had to pick my image, I struggled picking my image to use!  There are so many!  They even have sheets of stamps up for sale that I was absolutely drooling over.
Then I noticed that they have even more products!
Rubber Stamps
Digi Stamps
Full Sheet Stamps
Paper Flowers
Sticky Powder
Make-A-Mold
Gold Leaf
Metallic/Mica Powders

The prices are amazing!!
So if you're a rubber stamping individual or a digital stamper, this store is for you!

I had a difficult time choosing my image as there are so many of them to choose from.  I decided that since it is still summer and the weather is still cooperating in that sense I would create a summer card, plus a lovely Instagram friend has been indulging me with TONS of beach pictures so I was inspired by her to create a beach scene with the image I chose.

Lemonade Cat You can get the actual mounted stamp or digital.


So as stated, this challenge requires us to NOT use printed paper.
 I personally used to depend on printed, or design papers to create cards, but then I learned how to create my very own back ground.  There are several techniques you can do to accomplish this.
Distress your cardstock, use an embossing folder, stamp your own background with stamps!  You can even combine the techniques.  I created five cards each with a different technique.


With this card, I blended Stampin Up's Pool Party and Baja Breeze to create the "sky" then blended some Baked Brown Sugar and River Rock to create the "sand".  I heat dried with my heat gun then spritzed with some water to create the spots.  


For this card I stamped the image of flip flops to create a background.


This time,  I used VersaMark and stamped some flip flops all over the white card stock first.  Heat dried then used the exact same blending technique as above.  Same colors as well, except this time I didn't spritz any water on my card.


Same techniques as above, but this time I made it into a shaker card.


(*AAACK the picture does not do this card justice!!!*)

Finally, I used a piece of scrap card stock, ran it through my Big Shot using Stampin' Up's Cloud embossing folder and Hero Art's  Stamp & Cuts set.  For the sand I got the opportunity to finally use Ranger's Texture Paste.  I applied it then colored it with my copics.  Sprayed some Mister Huey's color mist and Tattered Angels. 


As you can see there are many opportunities to create your very own background with out having to use paper with a pattern or printed paper.
Use what you have and enjoy yourself!


Supplies I used:

Cardstock
Stampin' Up
Whisper White

Stamps:
Digi
Image:
Eureka Rubber Stamps: Lemonade Cat
Flip flop: Little Yellow Bicycle

Sentiment
Little Yellow Bicycle (Relax don't worry)
Hero Arts (Thinking of you)

Inks:
Stampin Up
Pool Party
Baja Breeze
River Rock
Baked Brown Sugar

Markers:
Copics
B0000 (cup)
R22 (cat ears/pads/nose)
R30 (cat ears/pads/nose)
R29 (straw and chair)
E00 (cat)
E25 (cat)
E27 (cat)
E29 (cat)
E33 (cat/sand)
E35 (cat/sand)
E37 (cat/sand)
E57 (cat)
E59 (cat)
Y11 (cat)
Y15 (cat)
Y19 (cat)
N1 (cat)

Galaxy Marker M White (chair)

Misc:

Yellow Stickles

Skittles (shaker card)
mini beads (shaker card)

Die cut: 
Hero Arts (Chat bubble)

Cricut Explore
I used my Cricut and uploaded the image twice, once including the whole image, second I removed the chair.  


Monday, July 27, 2015

Get Creative Challenge #20 using PolkaDoodles

Hello!  Long time, no see?!

Welcome to Get Creative Challenges #20!!! 
I am so pleased to be a new addition to the Design Team so I hope you're ready to read how I came to be and how my card came together!..... So grab some coffee first, you'll be here a while, wink, wink!

To start~

I've been MIA with a lot going on in my personal family life that ultimately had me going through a....hmmm, what I'd best like to describe as a "Mojo block".  I have been sharing my cards and refurbishing projects on Instagram quiet often here of late, so I guess I've been getting my mojo back, just not in the "blog" form.  

That is until I was contacted and offered a position on the Get Creative Challenges Design Team!!!

I have always wanted to participate in such a honoring position, problem was, I had no idea how to go about it.  So, I just went on my way of submitting my cards to be published in Paper Crafts Magazine.  That went great for awhile until they shut down.  So since then I've just been bumbling around creating and admiring other's work on Instagram.

It was the beginning of July when I got a message asking if I'd be interested in participating from the ever so talented Brenda.  I was absolutely flabbergasted!... Ha! I've always wanted to type that word!... Flabbergasted... (hehehe sorry). Brenda put me in contact with Angie and we exchanged messages and Angie told me I could take a look around and read the guidelines to see if it was truly something I was interested in.  So I went on the amazing adventure of looking around and I have to say there are extremely talented ladies in this group, I was actually very intimidated by it!  I asked if there was a "style" Angie was actually looking for, as for myself, I wouldn't really say I have one.  I do know I enjoy humor and whimsical things in life so I try to show that in my projects.  Animals, especially owls, giraffes, dogs and cats are my favorite.  Then there's my caffeine... I will stamp anything that has to do with coffee!  Angie reassured me that she liked what she saw of my projects so it was up to me if I wanted to pursue this opportunity.  
     SIGN ME UP....!!!  
So here I am!  I am assigned to the Purple Team and I have to say, I am still intimidated being this is my first ever Design Team opportunity and these ladies have some stunning work to boot!  

My first challenge, Monochromic Purple using one of our sponsor's digital stamps.  The sponsor being PolkaDoodles Crafting, just in case you didn't pick it up from the title of my blog *giggle*.  I  choose to use  Fredericka Debutante.  Something about her screamed classy and sassy of which I'm one of the two... HA!  
Seriously though, as I stated I typically stick to whimsical, animals, and coffee.  I've been practicing with my copics that I had purchased I'd say almost three years ago while we were stationed in Hawaii from a fellow crafter that gave up the craft as she was pregnant with her third baby, so the craft room was being turned into a nursery.  I used them right away, but then they got pushed onto the back burner as I was so used to using my chalks and water color pencils. Almost three years pass by not really using my Copics.  As stated before, I've been playing around on Instagram and I was inspired by a user to complete "#the30daydailymarker challenge" and I got to practice using my copics again, which is exactly what this lovely lady needed!  I love that I accepted this opportunity, as Polka Doodles have a lot of super cute images including OWLS... yes, I went window shopping!  Their website is so easy to maneuver!  I love all the options starting with the Downloads and Printables.  The website is even broken down into categories to make searching for specific themes super easy!  They even have a FREEBIES section... HELLO!!!  I went out of my comfort zone to create this card and after THREE days, yes, three days of playing around with her I finally came up with my final design with the help and support of the beautiful Brenda.


Finished card 4.25 x 5.50

As for the supplies I used:

Paper:
 Stampin' Up cardstock Soft Subtles
Stampin'Up Designer Paper Speciality Sweet Shop

Colors:
Ink: Stampin'Up: Perfect Plum
Pen: Uni-Ball Signo broad ~ White
Copic Markers
Hair/Eyes/Lips
BV00
BV02
BV04
Dress/Clutch
V12
V15
V17
Skin/Wineglass
V91
V95


Embellishments:
Purple Glitter (I'm unsure brand and exact name, the label is gone)
Glossy Accents (wine glass)
Cricut Design Space image (die cut background)
My Minds Eye die cuts from All Things: Lost & Found

Adhensive:
Sakura Glaze Pen
Tombow Multi Liquid Glue
Score Tape
Pop dot

Misc:
Stampin'Up Cutter Kit ~ Paper Distressing Tool


I added some glitter to her dress using my Sakura Glaze pen


The Stampin'Up Designer paper was originally purple with white polka dots (4.25 x 5.50).
I used my Sakura Glaze pen to cover the white dots with adhesive then added the glitter to tie in the glitter on her dress.   
I then distressed the edges using my distress tool and sponged the edges with Perfect Plum.  Placed Score tape to adhere to the base of the card.
I distressed and sponged a second matte measuring 3.25 x 4.50 and adhered it to the glitter matte.
The measurements for the Cricut die cut matches the second matte 3.25 x 4.50.  Adhered to the second matte.
I also used my Cricut to cut out Fredericka by using the "upload image" option.  I cut her at the height of 4 inches.  I used a pop dot on the bottom right of her dress as there was some dimension from the die cut and I didn't want her dress to get "squashed" or bent. 
Colored her with the Copics listed above then used the Glossy Accents on her wine glass.  I wanted to really bring out the "light reflection/glare" in her eye so I used my white Signo Uni-Ball to really show it off. 
Lastly I added the die cuts with the words Darling and Today*Tomorrow*Forever.

On a side note, as I was window shopping Polka Doodles I came across an awesome FREE sentiment:
Never Let anyone dull your Sparkle... UGH, I am totally re-doing this card and putting that on the next one!!!! 

So, please join me in this amazing adventure and post your projects for me to see as I am always inspired by everyone's work regardless if you're brand new to crafting or a long time pro!  Also, I hope that you take away something positive from my post and if I haven't at the very least, I have inspired you to join in on creating and participating with us!  Be sure to visit all the lovely ladies on your way and have a great couple of weeks until the next time!

~PaperPajamas


Tuesday, April 7, 2015

100 Day Challenge/Unity Color Challenge

Hello and welcome to my corner of the world that seems to vastly change every few years.

I have been through a lot the last two years and I'm making my way back one day at a time.

We have recently moved from Hawaii to Missouri.  I am getting my home unpacked with just my craft room and my husband's office to go.  I have finally found some of my supplies in boxes that were mis-marked, thank you packers for that... eeeeep.  Now that I managed to put together my desks and put up my computer and as said before, found some some supplies I had to get my fingers inky and sticky with crafty fun.
My first project was a mail/key holder that I made by altering a planters box I got at a  Church garage sale.  I only paid $1 for it, then using paints and some paper I had already on hand I hit Lowes and picked up some cup hooks.  I went to Joanne's (There's not one here at Fort Leonard Wood) while still in Texas visiting family and picked up some  chalk placemats and cork board.  If I remember all of this was less than $10.00.  I came home to Missouri and got busy and this is what came of it.

Before and After:


I'm so proud of this piece that will forever be in our home, wherever that may be.

Then I started back on my Instagram posts of which you can find me here:

In doing so I have regained inspiration and the desire to get back into my love of making cards again. I came across a fellow Instagrammer Loolabelle
that shared an awesome post of a challenge.

Making for 100 Days 

1. Choose an action 
2. Starting April 6th repeat said action up to and including July 14th!
3. Tag your posts with #the100dayproject

Easy right?!... Well Here is my Day01

And now... Day02, with this beauty I am also going back to my roots of entering challenges.  One of my favorite places to go is UnityStampCo.  I have been purchasing their Kit of the Month for a few years now and I have yet to be disappointed.  

I chose to go with the "color" challenge.  
I used the goodies included with my KOM which included a tag that I "painted" gesso onto it with my fingers.  Sprayed with Tattered Angels Glimmer Mist: Jazz Blue, Mustard Yellow, and Meadow Green.  Embossed the flower image with clear embossing powder then covered in with Stampin' Up water color pencils.
I sprayed the card base with the same colors I sprayed my tag with, stamped the "fly bird" with Memento ink.  
Using the jute and the button also given along with the kit I added those for embellishments.  Using my Sharpie Pen I added faux stitches to finish this card.  I just love how it turned out!  


Thank you so much for stopping by and I hope you enjoy these as much as I enjoyed making them!

Hugs~ PaperPajamas


Sunday, March 2, 2014

Sunday de-Stash

Sunday de-Stash

HI Y'ALL!!!

So my wonderful hubby purchased me a MAC for Valentines!  How lucky am I?!  Especially since he is so pro HP.  I've been eyeballing them every since my Momma informed me just how much she loves hers.  So with that I have been able to play with the iMovie... OMG... FUN!

I was able to do a process video for this lovely pocket card I made.....

I just added the little card to give you an idea where the pocket was... 
For this card I used Unity Stamp Company's February 2014 KOTM (Grow into Spring).

Inks: Stampin Up- Crumb Cake, Regal Rose and Gumbal Green.
Momento- Tuxedo Black

Glimmer Spray:
Art-C- Glitter mist Red

Cardstock:
I'm actually not sure as it was a "goodie" thrown in with the Kit I received from Unity.  It's a great quality card stock with a textured feel to it.  The green almost matches the Stampin Up Gumball Green.
Stampin Up- Whisper White  

Designer Paper:
Stampin Up *RETIRED* Pawsitively Prints 

Butterfly:
I actually used a die to punch this cutie out with Sizzix Sizzlits Die Butterfly#12
then stamped it using a stamp also from Unity Stamp Company.  This one was a Stamp of the Week 

Lovely Day designed by the lovely Angie Blom.

That particular butterfly is one that I made for another project that I had submitted for publishing and so I had quiet a few of the little guys left over and just felt horrible throwing him away so I put him in my little bucket to be used on another card.  
All I did with the butterfly, as he was already stamped and the flowers colored was I spritzed  the butterfly with the Art-C Glitter mist Red and colored over the flowers again using Regal Rose and of course the Gumball Green.  I really love how it changed the look of the butterfly.  

The measurements of this card is 4 1/4 x 5 1/2.

To see how I made this card, check out my process video on YouTube.  You'll get to meet a special guest when you do.... hehehehe....

NOTE: I stated in the video that the Kit of the Month cost $31, it's actually $26... Not sure where I got that number... 

Thank you so much for taking the time to watch my video and I hope it inspires you to use the scraps or fussing cutting that you ended up not using.


Wednesday, January 1, 2014

A New Year with New Goals

                                             2013


What a crazy year of life.

That about sums it up for me.  There was a lot going on within the family that just took precedence over my blogging and crafting time for me.  It all started with my husband, poor guy, he had it rough.
 He had knee surgery

 that pretty put him out of commission for a while for driving his motorcycle that we had purchased for our second vehicle here in Hawaii.


 (Confined to the couch, not fun)


  As some or most of you know we are a military family and we had to sell our secondary vehicle as the Army will only ship one vehicle, the other vehicle can be shipped at our expense.  That was out of the question for our budget.  Needless to say I became the chaperon for my kiddos and my husband.  Let me tell ya, that task can wear anyone out.  Especially the kids.  My husband would have to be at PT/Formation as early as 0500, which means we, the family, have to be up no later than 0400 and out of the house by 0430 to get him there on time.  So my schedule looked something like this:

Monday, Tuesday, Wednesday and Friday: Get up between 0400 and 0500 drive Hubs to PT.
                                                                       0530-0800 Get kids dressed, fed and taken to school.
                                                                       0830-0900 Take Hubs back to work
                                                                       1300-1430 Pick Kiddos up from school.
                                                                       1530-1600 Pick up Hubs from Work

Thursdays: Same except pick kiddos up at 1230.

Plus to add physical therapy and doctor appointments into the mix, this Momma lived in the car during the week. 

Then when Hubs just got the okay to ride his motorcycle again he injured his foot during an exercise mission at work.  Doctor misdiagnosed his injury telling him he sprained it then, no it's plantar fasciitis.  Went through all that to find out he actually had a fracture in his foot.  Two months of being in cast.


 then the walking boot.


On the road to recovery right.....

My poor husband, lol, went in for a pretty normal oral surgery.  During the anesthesia there was a complication that put him in ICU for three days. 

Talk about a scare that none of us, especially him, do not care to repeat.  His first words, written of course, "WTF".

  'Nuff said. 

2013 had some positives that took these negatives that made them seem small.  My Husband was able to re-enlist, not even a week after getting out of the hospital, to continue his career in the Army.  AS well as received an award for the hard work he has done to achieve it.

 
WE celebrated Christmas together.


WHOLE!
 
I've decided to start this new year with a promise to myself, don't sweat the small stuff.
If I don't get a blog post done, a card made, so what.  Don't give up, just start where I left off at.  I really wanted to get back into making videos, I even finally scored a tripod, doing so for only $5!!  HECK YEA!
 
I love sharing my crafty side, but I love my family more.
I appreciate the love and prayers we received during our down time, and I appreciate even more the sharing of our excitement in recovery. 
 
With all that aside, I managed to get my first project of the year done.  I took a blank 6x6 canvas from Ben Franklin's and went to town with it and created a little something my little guy.
I will be doing a process video when I make my big kiddo one. 

Thank you all so much for the continued support and taking the time to catch up with me.


Wednesday, July 3, 2013

Con-Fusion....

So HI!!!... OMG (Oh my Golly...) I am so darn behind on my blog!  I have been in a slump, a blog block if you will.  It seemed to hit once we, my family, moved to Hawaii.  I know... poor me lol.  We have been trying to get as much as Hawaii has to offer as we possibly can before our next move and let me tell you it's so HARD.  There are so many things to do here, but it can also be extremely expensive.  So we've been scouring the island doing as much as we can as cheaply as we can on a military budget.  So far we have hit up the Waimea Valley Falls:


I will not bore you all with all the pictures, but these are few of my favs.  We also did the hike to Manoa Falls... Talk about getting dirty, but so worth it!
Of course we hit up the beaches as often as we can.


Yet there is so much more to do! 
I have also been uber busy getting my youngest ready to start kindergarten this year!!  This Momma will be in tears.  He is doing phenomenal with learning his letters, numbers and sight words.  Yes, I've gotten him started on his sight words at 4 years old.  My oldest who is 8 struggled and I as a first time parent was at total loss as to why but didn't stress as to why he seemed so far behind because I knew that every child is different.  He was diagnosed with ADHD and Autism once we arrived here in Hawaii almost two years ago.  My big guy is so smart but struggled verbalizing his answers which in turn made it hard for me to understand how to help him and I.  So after getting him all the necessary paper work, enrolling him into EFMP (Exceptional Family Member Program) which works with military families with special needs to address their unique needs throughout the assignment process and after families have settled into their new installation. We finally have been going to appointments and social groups to grow and learn together.. What an amazing journey this has been so far.  I tell you, life is just so much happier in the home now that we know how to communicate with my big guy.  My big guy had an outstanding Kindergarten teacher while we were stationed at Bragg that gave us the stepping stones to testing and learning what was going on with our guy.  Then we moved here to Hawaii where his 1st Grade teacher, well, wasn't as great.  She wanted us to just medicate, medicate, MEDICATE!... That is not what we wanted and it really broke my heart as he was just pushed aside.  Thankfully he had a great Speech and Aide that really helped him out.  Then last year, PRAISE GOD, I tell you... if any of my readers are military or non and move to Hawaii (Oahu) and get Makalapa Elementary... BEG... no PLEAD to get Mrs. Ishida for your 2nd Grader!  Yes, totally name dropping.  She is oh gosh... trying not to tear up.... she is the kindest totally from the heart type of teacher.  My guy went from WBP (Well below proficiency) to at level!  He now reads books, although not his favorite thing to do, to even writing (would much prefer to read than write hahaha).
So needless to say my blogging has been neglected, but for good reason ;0)

My blogging wasn't the only thing being neglected, my poor craft room has been sadly been on the side burner as well.  I have managed to fill a few orders or card making requests and submit to a few magazine submissions of which y'all will find my cards published... yay!

I really want to get back to my roots of what got me started on my Card making love... Challenges!  Oh yes YouTube was the start of my papercrafting addiction... I mean... hobby... Then blogs to of which I discovered CHALLENGES!!  KAndrew was my first start and then I just started branching out trying different ones and I have won a few.  I can't tell you the amazing feeling it is to win a Challenge or to have cards published.  It is one thing to have your family and friends to tell you, "Oh you make amazing cards, I love your work!", because it's almost like they may feel obligated to not hurt your feelings... does that make sense?!... I've got some super kind friends, I also have the best that tell me... "Ah.... Annette... NO, that dress DOES make you look FAT!" I love them for their honesty so that I'm not later found on one of those FB posts making fun of a picture of someone with some crazy caption underneath it.

So with that being said I started browsing YouTube and the Internet for some challenges and that's where I found Fusion Card Challenge.  HOW FREAKING FUN!!!  This one is Super Duper Neat-O as the lovely ladies give you three different options to enter the challenge and you can enter as many times as you would like as long as you follow their very well detailed rules... regulations.... or let me just use their wording... Considerations ;0)

This Challenge the ladies put these sketches forward:
You can either submit a card using Jackie' Challenge or using Lesley's Challenge OR....
FUSION, the combination of the two!
I totally gunned for the fusion and this is what I came up with.


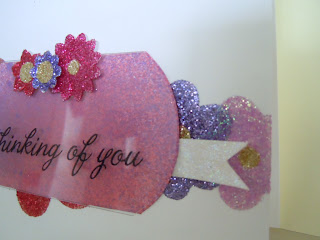
This Fusion (haha I keep wanting to type "fushion") Challenge I got to use up a LOT of my old stuff.  I am an Stampin' Up demonstrator and I love all the new goodies that I tend to forget about the old.  I used for the background to make the glitter flowers Stampin' Up Sticky Cuts Sweet which are pretty much die cuts from double sided adhesive sheets.  Lots of different glitter, not of which are all Stampin' up, in fact all but the banner are Studio G brand glitter. The banner on the other hand is SU Dazzling Diamonds.  For the smaller flowers I used SU Boho punch and ran them through my Xyron sticker maker then covered with glitter using the center covers of the Sweets to mask the center then removed to cover with gold glitter (I must make a video).  I then die cut a piece of window or acetate paper using my Big Shot and Sizzix Frame Back, Ornate #3 then trimmed off what I didn't want to create the shape I got.  I then traced the window sheet onto a scrap piece of cardstock and cut out.  Spritzed the cardstock with various ink sprays... Tattered Angels Glimmer Mist (Fully Purple), Sprinklers (Pink Balloon) and Mister Huey's (Pretty Pink).  Like I said, using up some items collecting dust.  For the banner I fussy cut it, ran through my Xyron once again and covered with Dazzling Diamonds. Cut in half and adhered to back of the spritzed cardstock.  Next I adhered the pretty spritzed cardstock to the base over my glitter flowers.  I stamped the sentiment using Hero Arts "Everyday Sayings" and StazOn Jet Black onto the window sheet.
Finally, I adhered my little flowers using dimensional for the smallest one, then placing dimensional foam adhesive behind the flowers to hide and adhere the window sheet to the cardstock.

This card was a LOT of fun, very messy, but so worth it!..... Hmmm I mentioned I should do a video... Ah shucks... since I mentioned it... I'll do it but I think I want to change one thing...


To be continued....